

Trying Out the Fastest Way to Implement FIDO Authentication: “YubiOn FIDO2 Server Service”
- Asa
- 2025年9月24日
- 読了時間: 6分
Recently, YubiOn released a new service called “YubiOn FIDO2 Server Service.” This service is primarily intended for developers and development vendors, enabling them to easily integrate FIDO (passkey) authentication into the services they provide. Normally, in order to properly validate FIDO authentication, developers must implement a variety of verification processes according to specifications such as WebAuthn. However, by offering these processes as a service, this solution makes it effortless to introduce passkey authentication.
Previously, Soft Giken offered a certified FIDO2 Server product called “YubiOn FIDO2 Server,” which had been approved by the FIDO Alliance. However, it was not provided as a service; instead, we delivered the necessary environment individually in response to customer requests. With the release of the YubiOn FIDO2 Server Service, this solution has now been fully service‑based, allowing customers to introduce it more easily and more quickly.
This time, we will use the sample application prepared by our company to show how simple it becomes to implement passkey authentication by introducing the YubiOn FIDO2 Server Service.
■Flow of Implementation
If you would like to understand the system architecture or authentication mechanism, please refer to the service overview.
Although the implementation flow is also described in the manual, the general steps are as follows:
Customer Registration
↓
2. RP Registration
↓
3. API Key Registration
↓
4. SDK Integration
↓
5. Operational Testing
Normally, in step 4 (SDK Integration), after obtaining the SDK, you would need to implement logic within your service that calls the YubiOn FIDO2 Server Service API. However, for this walkthrough, we will use a sample that already has this logic implemented, so you can experience the process more easily.
■ Trying Out the Sample
Environment Used
OS: Windows 11
Browser: Chrome
Passkey: Windows Hello (Fingerprint Authentication)
Source Code Editor: Visual Studio Code
Prerequisites: Node.js and npm must be installed.
I used Node.js (v22) and npm (v10).
(Installing Node.js typically installs npm as well.)
Service Registration & Preparation
Register a Customer (Free Registration)
●Steps
Open the "YubiOn FIDO2 Server Service" page and click “New Registration” in the top right corner.

By agreeing to the handling of personal information, you will proceed to the customer registration screen.
Enter the required customer information and agree to the Terms of Service, then click the “Register” button.
・Admin name: YubiOn (any name)
・Admin email address: An email will be sent after registration to activate the account.
・Customer name: Test Customer (any name)

After the customer registration is completed, a customer registration approval email will be sent to the administrator's email address.
Click the URL link in the email body to open the customer activation screen.
Once you register a passkey to log in to the "YubiOn FIDO2 Server Service" management website, the activation will be complete.

A passkey registration modal will appear, so follow the instructions to register your passkey.
In this example, we will use Windows Hello and register with a fingerprint.

Registering an RP
RP (Relying Party) is a FIDO term that refers to the service or web application that implements FIDO authentication.
The RP ID is an identifier used to distinguish that service, and it is usually the domain name. In the case of the “YubiOn FIDO2 Server Service”, to prevent unauthorized third parties from registering services, ownership of the domain is normally verified when registering an RP. However, to make it easier to verify operation in development environments, RP IDs ending with .localhost can be used without ownership verification. In this walkthrough, we will use that mechanism to proceed.
●Steps
Log in to the “YubiOn FIDO2 Server Service” management website and open the RP screen.
Click the “Register RP” button.
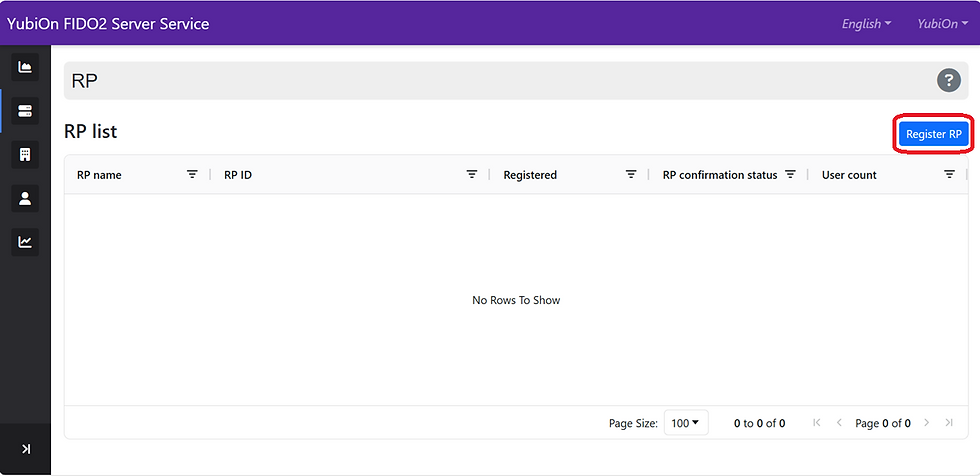
A modal window for RP registration will open. Enter the required information and complete the registration.
・RP ID: test-app.localhost (any name + .localhost)
・RP name: Test App (any name)

Normally, the RP would become “Verified” after confirming ownership. However, since we are using the development‑only “.localhost” as the RP ID this time, you can see that it is already marked as “Verified” at the time of RP registration.

Register an API Key
Create a key that will be required when accessing the YubiOn FIDO2 Server Service API from the RP you registered. You will register it using Nonce Signature Authentication, and you must make a note of the API Authentication ID and Secret Key that are displayed after registration.
●Steps
Open the API Key screen from the RP details. (You can open the RP details by clicking the RP you registered on the RP screen.)
Click the “Register API key” button.

A modal window for API key registration will open. Enter the required information and complete the registration.
・API auth name: Test API key (any name)
・API auth type: Nonce sign auth
※For this example, we are selecting Nonce Signature Authentication because of the implementation used in the sample application.
For actual production use, please select the appropriate authentication type.

After registering the API key, make sure to record the API authentication ID and secret key.

Preparing the Sample Application
You will use Visual Studio Code (VS Code) to run a web server on your PC.
Obtain the SDK Sample Application
The Node.js SDK source code includes a simple sample application that allows you to test FIDO registration and authentication features. You can access this sample by cloning the SDK source code from GitHub or by downloading the ZIP file and using the sample directory contained within it. Detailed setup instructions can be found in the README.md or README.ja.md file located directly under the sample directory.
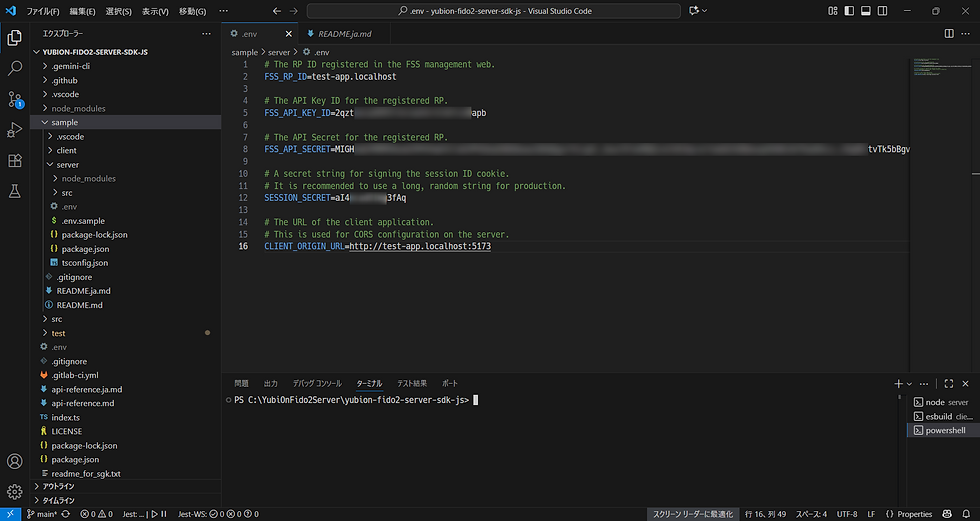
Set Environment Variables
Copy the sample/server/.env.sample file and create a new .env file in the same location.
Open the .env file in VS Code and edit the following values:
・FSS_RP_ID: test-app.localhost (the RP ID you registered)
・FSS_API_KEY_ID: (API authentication ID you recorded when registering the API key)
・FSS_API_SECRET: (Secret key you recorded when registering the API key)
・SESSION_SECRET: (A long, random string used to protect user sessions)
・CLIENT_ORIGIN_URL: http://test-app.localhost:5173 (URL of the client application)
Because of the structure of the application, the backend and frontend run on separate servers, so you will need to start both of them.
3. Start the Backend
Open the terminal in VS Code and execute the following commands:
# Move to the sample/server directory
cd sample/server

# Install dependencies
npm ci

# Start the development server
npm run dev
If the server starts successfully, it should be running at: http://localhost:3000
4. Start the Frontend
Open a new terminal in VS Code and execute the following commands:
# Move to the sample/client directory
cd sample/client

# Install dependencies
npm ci

# Start the development server
npm run dev
The client development server will start on a port such as: http://localhost:5173.
Verify Sample Operation
Once both the server and client are running, you can test passkey registration and authentication from your browser.
Access the Sample Application
Open your browser and access: http://test-app.localhost:5173/ (or http://<the RPID you set>:5173/). If everything is configured correctly, the login screen of the sample application will appear.

Register a User and Passkey
Click the "Create a new account" link to open the user registration page.

After entering any user information, click the "Register and Add Passkey" button.
A passkey registration modal will appear. Follow the instructions to complete the passkey registration.
In this example, we will register using a fingerprint—just as we did with the YubiOn FIDO2 Server Service.

Since the SDK is integrated, the passkey registration completes successfully.
Log in
Click the "Login with Passkey" button to log in using your passkey.
The user list is now displayed.

Passkey authentication was successful!
Verify Operation
To verify that everything is working correctly, open the management website for the YubiOn FIDO2 Server Service.
On the RP details page, open the “API Logs” screen. You should see the relevant information reflected there, confirming that passkey registration and authentication were processed successfully.

How was it? Although this was only a sample, we incorporated the SDK into the application and actually tested passkey registration and authentication. In a real project, you would need to implement your own service logic and then integrate the SDK. However, you may have seen how easily FIDO authentication can be introduced simply by adding the SDK.
■Summary
The YubiOn FIDO2 Server Service is a powerful solution for companies considering the adoption of FIDO authentication. It significantly reduces both development cost and implementation time. By using this service, you can quickly and efficiently integrate FIDO authentication—which enhances security while improving the user experience—into your own services.
You can register for free, so feel free to try it out.
■Related Links
[YubiOn FIDO2 Server Service]
[YubiOn FIDO2 Server Service Manual]