

Managing SSH Private Keys for Windows with YubiKey
- YubiOn

- Mar 6, 2019
- 4 min read
SSH private keys are usually managed by storing them on PCs and using them for server connections. However, suppose one store their SSH private key in YubiKey and inserts this YubiKey into their PC when connecting to the SSH. In that case, the need for storing private keys in various PCs is eliminated, especially since the private key is stored safely on the YubiKey device.
This article will delve deeper into this process, explaining how to store an existing private key on the YubiKey and make an SSH connection.
Environment
・OS: Windows 10 ver1809
・YubiKey 4 (YubiKey 4 or 5 series is available)
・Yubico PIV Manager
・Putty CAC 0.71
・CentOS 7 The key is generated with RSA 2048bit, and SSH public key authentication is set up.
Disclaimer
We are not responsible for any problems that may occur due to the use of the listed information.
By overwriting the credentials of YubiKey, the credentials currently used may be deleted and may no longer be able to be used.
Key Conversion
※Please skip this section if the PEM format is already being used.
First, convert the existing private key to PEM format.
If a key is generated using OpenSSH 7.8 or later with ssh-keygen, it is likely to be developed in a proprietary format, so convert it to PEM format. ※OpenSSH: Release Notes
Enter the following command to convert the key to PEM format.
※This command overwrites the existing private key, so please make a backup before executing it.
ssh-keygen -p -f id_rsa -m pemThis generates a public key from the converted private key.
openssl rsa -in id_rsa -pubout > id_rsa_pub.pemConfiguration of YubiKey 4
Now, configure the YubiKey to store the private key. Download YubiKey PIV Manager and Yubico PIV Tool used for configuration.
※The complete set of tools can be installed in the Windows environment using Scoop.
Please refer to the summary of Tools for Developers - What is YubiKey (Part 3).
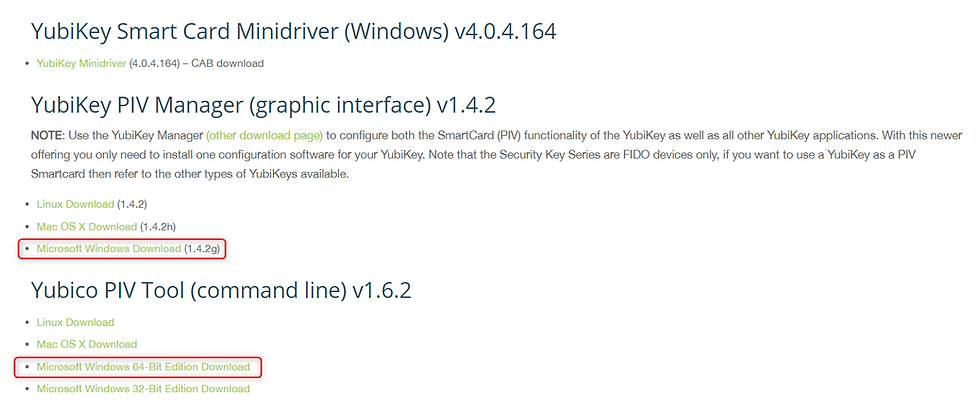
Unzip yubico-piv-tool-1.6.2-win64.zip and deploy it directly under the C drive.
Then, pass the path to C:¥yubico-piv-tool-1.6.2-win64¥bin.
Next, run yubikey-piv-manager-1.4.2g-win.exe and install.
The application will start automatically after installation—plug in the YubiKey.
Set the PIN code.

Use PIN Code to Access YubiKey's Credential Information
Next, select "Use a separate key."
※If nothing is displayed, press the "Randomize" button to generate it.

All PIV management operations in YubiKey require a 24-byte 3DES key called a Management Key.
※The Management Key is for later use, so please copy and paste it into an editor.
Finally, set up the PUK.

PUK is a code used to reset the PIN when the PIN has been locked.
This concludes the YubiKey PIV Manager operation.
Storing a Private Key in YubiKey
YubiKey has four certificate storage areas.
・9a — PIV Authentication
・9c — Digital Signature
・9d — Key Management
・9e — Card Authentication
This example will use the "9a" slot.
From here, the CUI tool will be used.
Execute the following command at the command prompt to store the private key in the 9a slot.
yubico-piv-tool -a import-key -s 9a -i id_rsa -K PEM -k(management key)※Please enter the management key without a space after "-k."
Storing a Self-Signed Certificate for the Public Key
Self-sign the public key that is the counterpart of the SSH private key to create a self-signed certificate and store it inside YubiKey.
First, create a self-signed certificate.
※Please execute the following command with the private key stored in slot 9a.
yubico-piv-tool -a verify-pin -a selfsign-certificate -s 9a -S "/CN=host.example.com/OU=test/O=example.com/" -i id_rsa_pub.pem -o 9a-cert.pem --valid-days=(number of days)This operation requires the entry of a PIN code.
-S: x.509 is the certificate description. The name written on the CN will be displayed on the OS certificate selection screen.
–Valid-days: Represents the expiration date of the certificate, which is set to 365 days by default if not specified.
Next, this certificate is stored in YubiKey.
yubico-piv-tool -a import-certificate -s 9a -i 9a-cert.pem -K PEM -k(Management Key)Check the settings.
yubico-piv-tool -a status
Make sure it is stored in the 9a slot.
SSH Connection Using YubiKey
The SSH connection is set using Putty-CAC, which can be downloaded here.
※In this article, puttycac-64bit-0.71-installer.msi is installed.
Now, set up an SSH connection using YubiKey.
Insert the YubiKey into the USB port and start Putty.
Go to Category > Connection > SSH > Certificate to configure the certificate settings.
Check "Attempt certificate authentication" and press "Set CAPI Cert...".

When the certificate selection screen appears, select the certificate which was just created.

The connection setup is now complete.
Now, try SSH connection using YubiKey right away.

After entering the user name, one will be asked for a PIN.

Enter the PIN.

While logging in is possible through this method, it can be optimized to bypass the certificate selection every time a connection is made by setting up Putty Pageant.
Putty Pageant is included in the Putty installer. If installed with default settings, it can be found in pageant.exe in "C:\Program Files\PuTTY."
Run pageant.exe.
After execution, the Pageant will appear in the taskbar.
Right-click pageant and select "Add CAPI Cert."

Add a certificate.
Once configured, one can connect without selecting a certificate the next time they access the site.
If a connection point is registered with Putty, one can log in by going to Saved Sessions > Select a connection point > Enter account > Enter PIN.
Tera Term can also be used by setting up pageant.
Conclusion
This article introduced setting SSH connections using YubiKey to allow users to perform operations without storing their private keys in multiple terminals. The following article will cover a similar process for the macOS.


